
Collecting And Saving Heirloom Tomato Seeds
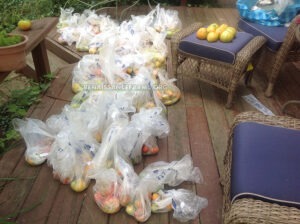
Collecting and saving heirloom tomato seeds are some of my favorite things to do. I love growing heirloom and open-pollinated tomatoes. I also love knowing that I could share seeds with the world. So I meticulously go through the steps of making sure it’s done with precision. In the previous article, I discussed the methods I use to select and start, transplant and harvest tomato seedlings and eventually tomatoes for seeds. This article discusses how I collect, process and save my heirloom and open-pollinated tomato seeds.
The Fermentation Method For Killing Diseases On Your Seeds
 The fermentation method is simply a process by which the seeds are fermented. During the process, diseases on the seeds are killed, giving the seedlings a better chance of being disease free. Before you begin collecting your seeds, you will need containers, sharp knives, cloth or paper towels, labels for containers. You will also need a source or water. I harvest my seeds by a sink with a faucet. If you have plenty of a particular variety, be sure that have a large enough container. I try to use at least a 50/50 mix of seeds/pulp and water. Here are the steps.
Labeling Your Containers And Squeezing Seeds Out
Label your container according to your variety. Once you have done that, it’s time to squeeze your seeds into your containers. For shapes other than elongated, cut across and down the middle. For elongated types, cut down the middle and lengthways. Now that you have cut, you can squeeze the seeds out into the container. There will be accompanying pulp, that’s ok. After you have squeezed, there may be seeds left in the cavities, simply use your fingers to help them out. When you have collected the seeds, pour some warm water in the container. Water can be a little hotter than warm. This gets the process of the pulp separating from the seeds, going. Now your process of collecting and saving heirloom tomato seeds is almost complete.
Porous Lids And Covers For Containers
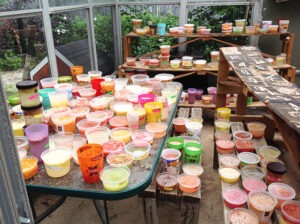 Cover your container with something porous. this keeps bugs out and allows the contents to breathe. Non porous covers greatly slows the process down. In about 4-7 days your seeds should be ready for cleaning and drying. If your tomatoes were really ripened, processing time may even be 3 days depending on the surrounding temperature. Hotter climates would produce quicker results. I process my seeds in a hotter than average greenhouse, so I can collect and clean my seeds on day 3, but I still leave them 2 extra days just to be sure that they are done. In my case, do not use lids because my greenhouse has screen doors that I close, so insects are not welcomed.
Cleaning And Drying Heirloom And Open Pollinated Tomato Seeds
Each day, stir your seeds a couple of times. This further helps the seeds separate from the pulp, which is your ultimate purpose. You know that your seeds are getting close or ready when the pulp have started rising to the top and appear somewhat moldy. The seeds will also fall to the bottom of the container. A foul smell may also accompany the mold. If left in the container longer, perhaps 1 week to 10 days, everything, including disintegrated pulp may be at the bottom of the jar. It’s much easier to collect seeds this way, but they may also start to germinate. Basically if when you stir most of the seeds have separated from the pulp and fallen to the bottom, you are almost there.
Cleaning Seeds Means You Are Almost Done
Now you are ready to clean your seeds and dry them for storing. You will need something for drying seeds on. Some people use parchment paper, or foam plates. I use screen door mesh and cut 8-10 inch squares out and use that for drying seeds. this way the seeds can dry more quickly because air flows through top and bottom of seeds.
Stir Your Seeds Well Before You Begin The Process
Before you clean your seeds, stir them up one last time. Wait a few seconds for them to fall to the bottom of container. Seeds that are not good often do not fall to the bottom. They stay afloat close to the top, or fall very slowly to the bottom. once the seeds have fallen, begin to slowly pour the top waste contents out of the container. Repeat this process until you have clean water and seeds only. Slowly pour all of the water out of the jar and spread seeds out on your drying surface. When they have fully dried, collect them and get ready for storing. Note: Seeds will most likely be stuck together and would have to be separated once fully dried. We will discuss seed storage for maximum life, in another article in our series of collecting and saving heirloom tomato seeds.


